Posts

Day Ten: The End (Aiden)

Image
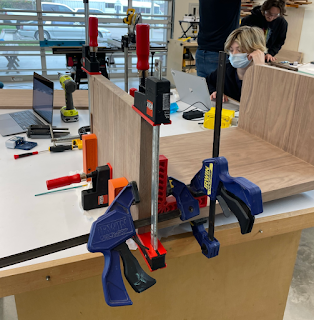
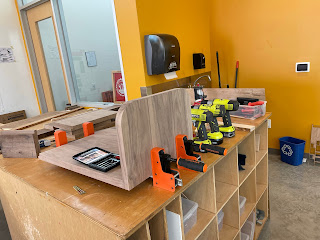
The End (At the time of writing this, my lamp project isn't complete, so I'll be talking mainly about my bedside table project.) I put the last coat of finishing oil on my bedside table project today, and that marked the final step in completing it as complete. With it done, I think I honestly really like how it turned out, and I think the finishing oil really brought out some vibrant colors in the wood, making it look like it was done by a professional. I did realize shortly after finishing that I put the phone holder on the wrong side, as I usually place my phone close to me on my bedside table, but aside from that small error and the slight lean of the bedside table forward due to the base not being at a perfect 90 degree angle I think that it's pretty perfect and it turned out really close to the way I wanted. That being said, the journey to getting it this way wasn't easy and I think that, despite having a passion for woodworking and doing projects in my garage lon...

Day Nine: Epoxy Imminent (Aiden)

Image
  Day Nine: Epoxy Imminent With my bedside table project basically done, day 9 was the start of the epoxy part of my lamp. I started day 9 by putting another layer of finishing oil on my bedside table, bringing me up to 2/3 layers until I was done. I went over the entire project with steel wool in order to smooth out the surface of the wood post-finish, and then applied another layer of finishing oil on to the project that would further strengthen the wood and give it an even more vibrant color. Once that was done I began planning my lamp project, and in preparation for the epoxy I sanded over the entire thing and put wood glue into the holes that might have epoxy seep into them. Sadly I didn't yet have the laminated wood that I needed to create the mold box that would go around my lamp to hold the epoxy in, so I planned to go to home depot after lunch to get that.     After lunch and home depot, I had everything I needed to begin the epoxy process, but I only had ti...

Day 10: Final Reflection (Nate Savarese)

Image
 In the end, I am very proud of my project and happy with the way that it ended up turning out. I think that my pets are going to like it, and if they don't it can still be used as a shelf or storage cabinet. I feel like, through the course of making it, I have become more confident and enjoyed making it more and more. After I finished designing it, I was very worried that I bit off more than I could chew, but then after working on it every day, I ended up planning it perfectly because I did the last step the morning of the last day. I learned many skills such as advanced table saw cuts, edge banding, how to joint, how to plan, how to put in dowels, how to make pocket screws, and many many more things that learned. I am proud of the whole project, but mostly the fact that I think I can now make many wood projects very easily by putting my new skills to use. My biggest challenge was when I put veneer in the circles on the front, then changed my mind directly after. This set me back ...

Final Reflection on Project (Isaak)

Image
From start to finish this project was fun and intriguing, figuring out how I was going to cut the tiles and going through many ideas to ultimately decide on one, sanding for hours to get the sides just right, all taught me good wood working skills and a great deal of patience. I feel like I could make another wooden creation on my own. Looking back on my project there are definitely things I would do differently. I would be a lot more careful with the CA glue so I wouldn't get any of it to seep on to the tope of the tiles which was very very hard to wipe off and some would not. That CA glue is the reason for my other thing I would have done differently. I should have been more careful with the Dremel when attempting to get rid of the glue because it started to burn the tiles. Finally I should have double checked the spacing and alignment of the tiles before gluing them on. I also was challenged with the frame and the precision that had to go into it, that was my greatest challenge ...

Day 9: Finally Finished (Isaak)

Image
 The day started with me using steel wool on my board and its frame to get rid of excess gunk after that I put the final coat of finishing, after the last stroke a great feeling of accomplishment came over me. I moved on to the checker pieces. Once I found out that there was an easier way to trace the symbols of the pieces the work went much faster. I then wanted to make sure that the symbols would fit and look good on the circular pieces I made circles on the software and put the symbols on top till it looked good. Then after realizing that the circles were actually less than an inch by a little less than 0.04 inches, I had to do a redesign, I only had to shrink the symbols a little, then centered them with the laser and started to engrave. During this process I messed up by using a purple heart circle for the king instead of my planed padauk circle easy fix I just made the king and queen on the opposite color out of padauk. I applied finisher on them and my work here is done and ...

Day 9: Finished? (Nate Savarese)

Image
  My Cabinet Yesterday Today was mostly finishing touches. I started the day off by power sanding everything except the legs with 150 grit sandpaper. This took up most of the morning Because I had to make sure that I was being thorough and sanding everything evenly. For the remainder of the morning, I sanded the legs by hand. This was very annoying because my hand kept on cramping from the position that I was holding the paper. After lunch, I started by repeating that process but with 220 grit sandpaper. This made the wood a lot smoother. I then attached the legs to the wood and evened them out so the wood would stay sturdy and not be wobbly. Then I used a piece of cloth and a beeswax finish mixture to give the wood dark natural walnut color. My Cabinet Today

Day Eight: Woodworking Complete (Aiden)

Image
 Day Eight: Woodworking Complete With all of my woodworking completed yesterday, all I had left to do was finishing touches and extra features. I started by sanding the piece down and making any rough edges or imperfections smooth, but it started raining before I was done so I didn't get to finish. Stuck inside because of the rain, I got to work hot-gluing the LEDs onto my lamp piece. My original plan was to have the LEDs only on the bottom part of the lamp, but since I still had multiple feet of LED string left that would otherwise go to waste, I decided to also add it to the top piece and connect the two with a cool wire-coil design in the center. I finished that design right before lunch. The lighting on my lamp piece      After lunch the rain had mostly stopped, so Mr. Grisbee set up a temporary table for me using some sawhorses and I started work again. I ran the router over it to round the edges and give it a more connected look. Once that was done, I sanded it...

Day 8: house on legs (Nate Savarese )

Image
Almost finished house on legs Today, I made the legs for the table, and finally sorted out the inside of my circles. In the morning, I used a sandpaper bit on the Dremel to get all of the super glued veneers out of the inside of my circles. I replaced the circles with dark black paint, when the paint dried, it kind of looked like the wood was burnt into charcoal but it also gave it a really cool look. For the legs, I got three pieces of walnut wood and trimmed them down to how I wanted them to be. I then got two really thick pieces of scrap walnut that I used to cut out the peg legs. for the peg legs, I trimmed them to a block, then did an angled cut to make a taper on the leg. then I used the router to round the edges of the legs to make them more smooth and look better. Next, I screwed the legs and boards together to make a rectangle using the pocket hole technique to make the screws sturdy. I did mess up with the screws multiple times by cracking the wood, screwing too far to have t...

Day 8: Board completion (Isaak)

Image
 After a week and a half of work I could see the end I started by sanding the bottom of the board and its frame for the final time, it gave me much satisfaction knowing this would be my last time sanding. Using the skills from the past week I sanded without a problem smoothed out all the surfaces and made them soft to thee touch. After the sanding was complete all I had to do was dust off the board and apply the finisher. It turns out the finisher I used was edible not that one would eat it but in theory you could. I had to go over my piece once with finisher and one more time with a clean rag to clean up all the globs. The curiosity of how much darker the woods would get after the finisher was something that I had been curious about from the start, I found out that the cherry wood I got was from a light colored cherry tree the wood was much lighter than what I had expected, however it is a good thing, it was able to give the board the contrast from light to dark much like a checke...

Day 7: The Frame (Isaak)

Image
 In the morning I finished making my frame pieces and realized something, I messed up. I cut off the corners of the wood so when I needed to find the center of it it became very difficult. I made this mistake yesterday and I should have had the foresight based on that to not do that however I didn't so I resulted to using my previous frame to line it up with the router bit. After that I took great care in cutting the pieces to 45 degrees. I did not want a repeat of yesterday. My heart pounding on each cut until it was done and the fame fit together without any of the pieces being too short even barely. I proceeded to glue the frame to the board I used wood glue this time and held it together with a band clamp. After that I waited for 3 hours until I could take the clamp off. I sanded relived that the frame actually fit this time.

Day Seven: Finishing The Old, Starting The New (Aiden)

Image
 Day Seven: Finishing The Old, Starting The New      With all the pieces of my bedside table fully prepared and ready to be glued, I finally got to start my second project. I came in the morning and got right to work gluing up the pieces of my bedside table, starting with the top. I had a few changes to make to the sides and bottom of the top part before I glued them on, but I had plenty of time to make those while the top was drying. We had a small clamp shortage around the time I finally got to glue up the sides of my bedside table, because Nate was also gluing his dog-house up, but eventually I got to get everything but the bottom of the top part glued and drying before lunch. My wood drying after being glued up       Once we got back from a surprisingly long lunch, I got right to work gluing on the bottom of the top part, and with that finished in around a half hour, I was done with the bedside table until the next day. Faced with a few hours ...

Day Six: The First Connection (Aiden)

Image
 Day Six: The First Connection (Aiden)      Today was the day I got to finally got to start putting the pieces of my project together like legos. I started the day by making a few final touches on my pieces of wood, which included sanding, small final cuts, rounding the edges of the base, and getting everything organized and ready to be put together. Once I finished with getting all the individual pieces to look like I wanted, I got to work on making a grove on the top peice of the table that will fit my phone. It took me a while to set up borders for my router so I could get a perfect grove, but in the end it works really well and I'm glad that not only does it look good, but it will also keep my phone from falling off the desk in the middle of the night, something that annoyed me greatly. With that grove finished, we headed to lunch.     After lunch, I got to work using a guide to drill four holes, two on the back board and two on the foot board, ea...